Thursday, July 10, 2014
Monday, July 7, 2014
Love this candy #1..here have a look
Create Something Catchy Challenges: Time for a candy #1: Hello lovely people.. Hmmn.. enjoying the weather? well.. oh yeah! It's pouring here like hell since morning and I'm loving it.. &...
Thursday, July 3, 2014
The much ado about Star lantern….
Last Christmas my daughter turned 1 year old. I remember she
used to cry while teething, vaccination etc and there was only Yesterday one
solution….Take her to the balcony and point out to a Star lantern hanging in
our neighbors house. . . Now she is far
bigger (I mean by 6 months) but her love for star lantern has only grown. So, yesterday
I decided to hang a star lantern in our balcony. But where do I find a star
lantern in this season when the monsoon is ready to kick in and all shops are
displaying only raincoats and umbrellas……….An easy solutions I thought…make a
star lantern. . . I also involved her in the project (allowed her to color and
stick glitter…..
And here it is….
You can download this layout if you like. You will need five
of these
You will need card paper (You can experiment with different
colors and prints)
The five side cut-outs…. (At this stage you can punch holes,
paint etc all before sticking)
Tuesday, July 1, 2014
Kids creativity workshop...an art synergy
Every 3-4 months I conduct a Kids workshop where kids of different age bands work together on art and crafts for a series of days when they learn about drawing, painting, paper crafts, basic craft techniques like collage, gift packing, card making, simple origami, basic quilling, flower making, stamping, misting , embossing etc.....These sessions are great especially because kids come with no reservations and are always willing to unlearn, not copy and think unique.
However, this was the first time I had kids below the age of 4 attend this one day session. Of them 3 kids (including my own) were between 16 to 19 months, who cant speak, read or write (while their mommies were sitting in the room n chit chatting). I thought to myself it would be challenging to get them to do artwork. But I was wrong, they were wonderful. I am completely amazed at them and myself!
Here is the final artwork they produced.
With the toddlers I used safe non toxic colors with special toddler grips, and home made paints like turmeric (haldi), Spinach (palak), beetroot extracts and their hands/ feet.
For the kids above 2 years let them use crayons, paint brush, gum/glue.
Now here is what they did simultaneously but independently (I couldn't capture all pictures as I was too involved with the children at times, plus my hands were messy with veg colors.
This is how beautifully the toddlers smeared haldi all over a huge sheet...The other kids pointed out that their finger traces looked like tree barks or animal stripes...
I taught the 2.5 yrs old drip painting which is a form of abstract art where you intentionally pour paint in some spots and turn the canvas too let it flow on its own.
Then finally came the fun part. They cut the pieces to their own imagination and stuck it together and color over it using similar techniques. The team (without speaking) mutually decided to let the eldest 4 year old take over this job....
......And finally what a beautiful piece of art they put together. . . This was a great learning from me, them and their mothers (especially some who thought their kid didn't like arts and craft)...It was great to see the otherwise helter skelter kids sitting in one place, taking inspiration from each other and producing this beauty of synergy..Will do something similar soon. I hope you feel inspired too
![]() |
| Add caption |
However, this was the first time I had kids below the age of 4 attend this one day session. Of them 3 kids (including my own) were between 16 to 19 months, who cant speak, read or write (while their mommies were sitting in the room n chit chatting). I thought to myself it would be challenging to get them to do artwork. But I was wrong, they were wonderful. I am completely amazed at them and myself!
Here is the final artwork they produced.
With the toddlers I used safe non toxic colors with special toddler grips, and home made paints like turmeric (haldi), Spinach (palak), beetroot extracts and their hands/ feet.
For the kids above 2 years let them use crayons, paint brush, gum/glue.
Now here is what they did simultaneously but independently (I couldn't capture all pictures as I was too involved with the children at times, plus my hands were messy with veg colors.
This is how beautifully the toddlers smeared haldi all over a huge sheet...The other kids pointed out that their finger traces looked like tree barks or animal stripes...
I taught the 2.5 yrs old drip painting which is a form of abstract art where you intentionally pour paint in some spots and turn the canvas too let it flow on its own.
After practicing on this sheet of paper she ddid the same on the haldi smeared paper to create black / red trees effect (when you mix spinach green and beet red in equal proportion you get black..they discovered it!)
Initial session to get the kids acquainted to each other
In the mean while the 3 year + olds made some random sketches, paintings etc.
The leaves that you see are not painted but are vegetable prints made from a cut okra (bhindi) and little gourd (tindora)
......And finally what a beautiful piece of art they put together. . . This was a great learning from me, them and their mothers (especially some who thought their kid didn't like arts and craft)...It was great to see the otherwise helter skelter kids sitting in one place, taking inspiration from each other and producing this beauty of synergy..Will do something similar soon. I hope you feel inspired too
Saturday, June 28, 2014
Wall clock............My successful Plastic experiment...
Loved the outcome, its different, light in weight and chic....
So much plastic lying all around. I was looking for more ways to innovate. I wanted to experiment with the Polystyrene (eg, yogurt container, Kids chocolate packaging) type of plastic in particular since it has a low heating point. So I collected all sorts of these plastic packing materials, cut them into small bits (if you have a shredding machine, it will be far easier)....Now the challenge is to heat it. You and me know that when plastic burns it leaves dangerous fumes. Hence I just wanted t heat it and not burn it to attain certain flexibility.
So I gathered several packaging materials, orange, blue, green, white, non opaque as you can see. Arranged them in a grouped pattern and packed it tightly in a round aluminum baking tray lined with a baking sheet. I left it on the terrace in the hot scorching sun for 5 hours (which helped the material drastically soften. With a magnifying glass (if u remember as kids we did this a lot in school) I concentrated the sun rays in certain areas which cased the material to nicely merge into each other as you can see. This activity already merged the particles into one sheet after which I simply painted, decorated and varnished it. I worked with a local watch shop to get the clock movement in place.
Unfortunately I didn't know this would turn out this good, it was just an experiment. So I dint click step by step photos. However for those of you interested I found a similar technique online . http://www.atomicshrimp.com/st/content/plastic_moulding_2
However if you do not want to go to this trouble you could simply work with ready made reisin granule you get in online shops.
Warning: This process does leave harmful gas and has been performed in a well ventilated area using a respiratory mask.
Tuesday, June 17, 2014
Wow...A hot air balloon
I wanted the kids to do something new. So the challenge was
to use any household material to make something different and the change the
look completely (that’s how I work in my recycled projects)..So no converting a
container into another container, no painting CDs (unless they use it further
as something else) and doing something they have never seen before (no
copying). The best part about kids is they are honest and wont do a google
search to get ideas….So I had a 4.5 year old and my 18 month old work on this
(she tears, colors, sticks, does finger printing, learns, entertains and is a
handy craft companion)…..They had exactly 45 minutes, which with kids usually
extends as u have to persuade them to stop. They keep changing their mind,
adding on and the final stage never seems to come.
They picked a lot of materials but some I had to take back as
they aren’t meant to be recycled like the TV remote and my house keys (Though I
wondered what they would do with it!)...Anyway, here are the materials they
used….an old plastic shuttle cock, a broken plastic racquet, a burst cloth
ball, pins, threads, paper and paint, scissors, some old broken bunny hooks,
ribbons, glue.
I think this is brilliant……..A hot air balloon (they dint
know that’s what its called, but they had seen it on TV)….I would never think
of this. They also attached a string behind to hang it.
How you can do it:
Paint the shuttle cock as a basket
(brown) and fill it with paper, thread, sponge or anything which is light in
weight.
Put the 2 bunnies inside
(you could use any small plastic toys you may have). Now decorate the ‘basket’
with balloons, ribbons….To make the balloon they had 2 versions.
They made the head of the racquet as a base (which they also
used to shape the balloon). They first made a paper balloon but realized it wasn’t
sturdy enough hence they went back to their earlier plan of wrapping the cloth
around it to which they could attach a pin and also hang it.
Paint some clouds and sun as decoration.. .
How can you do it better:
(1)You could use a real gas/ helium balloon (the one that
rises in the air) for fun and watch the basket which is extremely light in
weight rise.
(2) If u like to see it as a parachute you could tie it to
the shower cap and let it float down especially if you stay on higher floors
and it’s a windy day!
I have submitted this artwork for kids recycle challenge http://www.artsycraftsymom.com/2014/06/kid-friendly-recycled-crafts.html
Monday, June 16, 2014
Do it with the kids
As we grow up our minds our conditioned to think a certain
way without realizing the restrictions they bring upon us. Try asking a 13 year
old to describe a picture of a cat and ask a 3 year old to do the same. The 13
year will make u feel stupid for asking this in the first place but after
insisting may sum it up saying “It has four legs, is sly, sleeps all the time
and sneaks in to steal fish”…Whilst the 3 year old will give you a long
passionate description. Will refer to the cat as her or him, it is not four legged
but has two feet and two hands and will definitely comment on the tail. Will
describe its various colors, eyes, whiskers, size, textures, habits etc….All
this cause they are still in the process of discovering it. . . And that is
what keeps them going. The day you stop discovering new things in your work,
families, people around you, they get boring and you take them for granted…..Anyway,
you deal with yourself some other time! ..But you should work with your kids to
make their own life interesting, open their minds and keep the zing alive
forever.
Its only after I had my own did Ii realize there is so much
to learn from the kids. Its only after I started conducting workshops with them
did I realize that they overflow with ideas and they know how to deal with them
(most of us adults can’t, we need music, quick bites, a drink , a smoke or
atleast company to get us going in that direction). In my creative workshops
with grown- ups I teach them art and crafts, have a clear agenda to craft
flowers or paint a landscape, while with kids I just enable them with art craft
techniques and their minds conquer the rest. So I have decided to create a page
on my blog to list things you can do with your kids. …..
Wednesday, June 11, 2014
Dream card
This card portrays a girl fantasizing her moments with her lover......
Here's a short poem I wrote while making the card
Flying Kisses,
Hits and misses.
The cupid strikes,
My heart abides.
The stars want to see
You dance with me,
.............I swirl , Your swirl , we swirl
When the Card (flap) is shut it appears as though she is in his arms....
But when you open it, you see she is only fantasizing....
And for those craft lovers, do not miss the silver bells, the paper folds on her skirt which swirls each time you open/shut the card,
blue and white ribbon folds and the other shiny embellishments to give a night dreamy effect
Floral touch, Wedding bells foil embossed with vintage scripts
I have entered this http://craftycreationschallenges.blogspot.in/2014/06/challenge-265-tic-tac-toe.html
challenge using the horizontal theme of Two
layers, Ribbon and charm
Add wings challenge http://craftsandmeinspiration.blogspot.in/2014/06/june-challenge-149-add-wings.html
Bright & Bold challenge http://www.cinspirations.blogspot.in/2014/06/challenge-269-bright-bold-colours.html
Men Challenge: http://thatcraftplaceblog.blogspot.co.uk/
Love & Marriage http://catchychallenges.blogspot.in/
http://thecraftingcafe.blogspot.in/
Love & Marriage http://catchychallenges.blogspot.in/
http://thecraftingcafe.blogspot.in/
Tuesday, June 10, 2014
5 min wall art
Quick butterflies made up of card board on the wall. The best part is that on a windy day these garden butterflies appear to flap their wings...
I have committed to make my garden wall a learning wall for all the kids who come by. The below vertical garden goes very well with these butterflies....See this link if you missed it earlier
http://omnimood.blogspot.in/2014/02/garden-art.html
I have committed to make my garden wall a learning wall for all the kids who come by. The below vertical garden goes very well with these butterflies....See this link if you missed it earlier
http://omnimood.blogspot.in/2014/02/garden-art.html
Thursday, June 5, 2014
Mini Garden .............with real plants
I love upcycled art, I love miniature craft and I love
gardening….So what better than a full fledged living mini garden (18” X 11”
inches)!
Here are the steps and you can do it too (Let me alert you ,
we are talking about living plants so u must take care of them). I water them ,
feed them and talk to them each time I step into my garden.
I got hold of a wooden electric box (you could do it in a
plastic or clay tray which will last longer), cleaned it and sketched my garden
landscape on paper. I wanted to include a water pond, relevant pond creatures,
a bridge, a park bench, a garden patio
and a shade area.
Step 1:To start with I started designing the pond area. If
you have the time and inclination you could actually contain water in it with
floating or aqua mini plants
(http://www.aquascapeinc.com/index.php?page=articles&a_id=62). However it
gets quite tedious to clean it regularly (it catches water worms, mosquitoes
breed) plus the birdies use it as a
water bath and damage the plants. So I broke(Yeah, broke! I dint get it cut coz
I wanted some cracks to appear to create ripple effect in water) a glass to
make it fit the box as per my design.
Once done, I painted the glass with water color paints with appropriate shading
using blue, yellow and green. I layered the base of the box with foil. This was
primarily made to serve two purposes (a) During the day the foil reflects light
and give a beautiful clear water effect to the pond (b) the bright reflection
of it keep the birds away from spoiling my plants.
Step 2: I wanted to build solid land around the glass which
will hold the glass tight and serve as a base to my garden. No better medium than
white Portland cement (I used JK White). To make the mortar of sand, cement and
water I used a proportion of 2:1:1. In the box / tray I placed a plastic square
box to block the space for my plants. I placed the glass as per my design and
cemented around it. When the cement was slightly settled I placed small pebbles
and shells around pond. On either sides of the pond I placed 2 sticks to mark
holes for the bridge I was to add later. Remember cement takes about 2-5 hours
to dry, but since I was planting in cement structures I need to cure the
cement. That simply means spraying water over the cement patch after 24 hours
and repeat again after another 10-12 hrs. This also serves to remove the excess
lime in the cement which can harm the plant growth.
Step 4: Make the bridge: You can gather twigs in your garden
, or sticks or anything to give a wooden effect. Once you have measure thee
length and the width of the bridge, cut the sticks accordingly and stick them
on a thing piece of cloth. Once dry cut it along the stick (If your cloth is a
strikingly different color you can paint it. I chose a difficult method to do
mine. I actually tied up each stick to another to form a garland. This is much
sturdy and also work well if your planning a hanging bridge, but the tying has
to be done correctly such that is balance the sticks evenly across. Once your
base is ready, place two thick wires across the pond to prepare a base to place
the bridge. Stick your stick structure to the base wire or if you have stringed
it together like I did. . simply tie it to the wire……
Step 6: Park bench…..This is the simplest step. Just get hold of ice cream sticks (that will be a good excuse for you to hog on some!) Stick three stick as the sitting area. I used Fevikvick . You could use an fast stick glue. Once dry, break one stick into two equal halves and stick it to the front forming the front two legs. Once dry, create the back legs by sticking 2 full sticks on either side. Lastly just place two long sticks to form the back rest. And voila!, you’re ready to sit on it.
Step 5: I wanted to build an archway garden tunnel (I enjoy
walking in these in real gardens and they are rare).. . So once again use a
wire to build two arches as per the design.
I joined them with intermediate
wire pieces as I planned to let creepers spiral on them. My creeper is still a
baby and growing. However you can follow this link to see how it will turn out
finally I assume.http://www.123rf.com/photo_7613464_green-archway-in-a-park.html
Step 7: Garden Patio (as in the pic above): White was the color I was thinking of. In any piece of art you need to balance colors (as beautifully as nature does it) to be appealing to the eye. White was missing. . Although I used white cement, due to the sand it seemed beige. So I used plaster of paris. It is also very fast to use. I gather some big glass pieces to create a patio. You could use pebbles, flowers, stones, old jewelery or anything to create a design in the plaster of paris but u must be quick as it dries within 10 mins. I used 2: 1 proportion of plaster of paris to water ratio. If you want it to set quicker use hot water.. . If you don’t like white you could simply add a tube of poster colors in the water an get the color you want.
Step 8: Garden Shade.
I simply love the patterns and colors that throw up when sunlight passes
through painted glass.
I got hold of an old CD, removed the plastic coating on
it , cleaned it till it was completely transparent.
If you don’t have patience with a CD you could use a plastic / glass lid which
suits you. I drew some random leaves on
it and painted it with glass paints to give a translucent effect. Notice in the
afternoons when the sun is overhead it throws a beautiful shade and is enhanced
coz of the bright white plaster. You could ship this step altogether if you
plan to place this mini garden indoors.
Step 8: Make garden miniatures: (my favourite)……………design
small pots, small birds, frogs, mushroom, swans, ducks, butterflies, aligators,
tortoise all that you can think of. Since my tray / box is small I only stuck
to birds and frogs as I wanted to make a “human friendly” garden on the other
side. Since, I would water the plants, I used polymer clay to make it water
resistant. If you do not plan to keep real plants you could use cold porcelain
to make these miniatures. Here are my
frogs, mushroom and birds.
My rooster n hens (I have planted a variety of moss here
which will cover this soil and the cracks in some days). So it will appear as
though the hens are feeding on them and the cracks will space out the moss
well.
I made these pots to plant
succulents as they need less soil and less water.
For birds I just used my imagination and made a small pair
of blue birds, stuck them on a small piece of show glass on a medicine bottle
cap to appear as a bird bath.
And you cant miss my oysters!
Step 9: Gather the plants. This is highly subjective.
However first decide where you will place this garden. The amount of sunshine
it will get. The number of time you will water and how well it holds water. For
starters I recommend using succulents/ cacti as they care for them selves.
However if you are like me, you may venture into other plants which will add a
lot of fauna to the garden.
Step 10: Assembly. Now that you have all the parts of your
garden together you just have to set it up. I suggest start with the plants.
Sometimes you realize that plants take to certain directions and sides, this
may make to rework your plan. After that I got my animal and pond in place. I
stuck the frogs, oysters, bird bath etc with fevikvick. I haven’t stuck to mini
pots as I keep them under my painted shade in the afternoon overhead sun as I
use them to plant seedlings and then transplant it. This design has withstood
the rains, storm and sun till date. It has nurtured the plants in it and has kept
the pesky crows away (thanks to the reflection)…….
…………………………….Not to say the least, its placed in our balcony
where we check it out over our morning tea, my kid has learnt all the pond
creatures and the associated flora fauna thanks to this project….
Supplies I used (However in my description I have given supply alternatives)
A wooden tray
polymer clay (air drying)
potting mix soil
Plants (as described)
Sticks/ ice cream sticks,
Strong glue/ fevikwik
glass and glass paints
white cement
pebbles & shells
sand
pearls & mirrors
thread
PS: I realized in the hindsight that I hadn't clicked pictures while making it. Hence excuse me for that.
Sunday, June 1, 2014
2 minute Gluten free oats cookie chocolate (microwave)
As I see my kid munching on junk it troubles me that
probably I’m not offering her sufficient alternatives. Wanted something low
fat, more nutritious and of course tasty. Hence after much experimenting I have
arrived at a perfect and easy recipe of oats , ragi ( finger millet) and
raisins which is a hit among kids (and adults)…
Here is the list of ingredients:
- One cup Oatmeal (this is a great source of fibre among other benefits and will also give your cookie a nice munchy texture)
- Half a cup Ragi/ Nachni/ finger millet flour (you can add all purpose flour instead if you like but ragi is extremely rich in calcium)
- One egg (you can choose to skip this one, but I found the cookie to turn out less brittle with egg)
- One table spoon castor sugar (you can add more if you please)
- One and half table spoon unsalted butter (you can add oil instead)
- Three table spoons cocoa powder.
- Pinch of baking powder.
- One tea spoon salt
- One cup milk
To these you can add any of these ingredients as per convenience
and preference. (not more half a cup)
·
Sunflower seeds/ Pumpkin seeds/ crushed peanuts
·
Dates
·
Raisins(if u like you can soak these in rum for
an hour before using it)
·
Assorted dry fruit pieces (make sure these are broken
into smaller pieces (powdered if necessary)
·
Choco chips
·
Rice crispies (lesser than 1/4th cup)
·
Flax seeds (this will give you your dose of
omega 3 nutrients too but add very few as it may add a very strong taste)
Process:
Beat the egg well , gently add flour, sugar, oats coco
powder. Continue mixing till you find it difficult to stir anymore as it
hardens. Now slowly add milk as you continue stirring the mixture. Now add rest
of the ingredients till mixed well. The consistency is thicker than that of
cake but thinner than bread dough. Line your baking tray/ microwave friendly
vessel with butter/ oil and place the dough in it. Here you have to ensure that
the dough sits flattened (hence it has to be flowy in consistency) , because if
it’s too thick it will not bake well. Remember we are using less oil than
normal!............just a 2 minute wait and your cookie is ready (depending on
the power etc, you may have to cook it a little more…if you cook lesser it will
be like hard cake which is better than it being burnt!) Just poke it with a fork and check. Your fork
should come out clean if cooked.
Once done, let it cool completely and you can pack it in a
jar to carry some daily for the next week. I can’t really comment on how many
days it lasts without refrigerating it as it has been polished off within 3-4
days in my house.
Thursday, May 29, 2014
Wednesday, May 28, 2014
Thursday, May 22, 2014
Wednesday, April 30, 2014
Tuesday, April 8, 2014
Friday, February 14, 2014
Orange (Citrus) cake microwave
I never thought id ever post recipes...but here I am my experiment with citrus cake turned out extremely tasty!
You need 2 eggs, 1 cup powdered sugar, 1/2 cup vegetable oil (or butter), 1 cups flour, 1 cup semolina, 3 teaspoons baking powder, 1/2 teaspoon salt, 1 cup fresh orange/ sweet lime pulp, zest from oranges, vanilla essence....
First beat the eggs well and add all the other ingredients except zest. I dint use a juicer but manually extracted the pulp such that it remains intact and tastes great when u bite into it. Gently sprinkle the zest. I added lesser sugar as the oranges and sweet limes I used were extremely ripe and sweet. Pour into a microwave bowl lined with butter/ oil and I let it cook in the microwave for 7 minutes (keep checking that it doesn't over cook or will lose the pulp taste
Once done I scooped out the center and put some orange marmalade, sprinkled icing sugar and designed the cake to look like an orange slice....
It tasted great and kids love it! Later I experimented the same with fresh pineapple juice, turned out lovely too!
Thursday, February 6, 2014
Garden Art
Used some box card boar, old packaging material and paint to make this hanging wall art. Plan to get some nice plant for the stone basket........current have laid grass!
This was picked by recyclart Org...see this http://www.recyclart.org/2014/07/vertical-garden-kitchen-scraps/
Friday, January 10, 2014
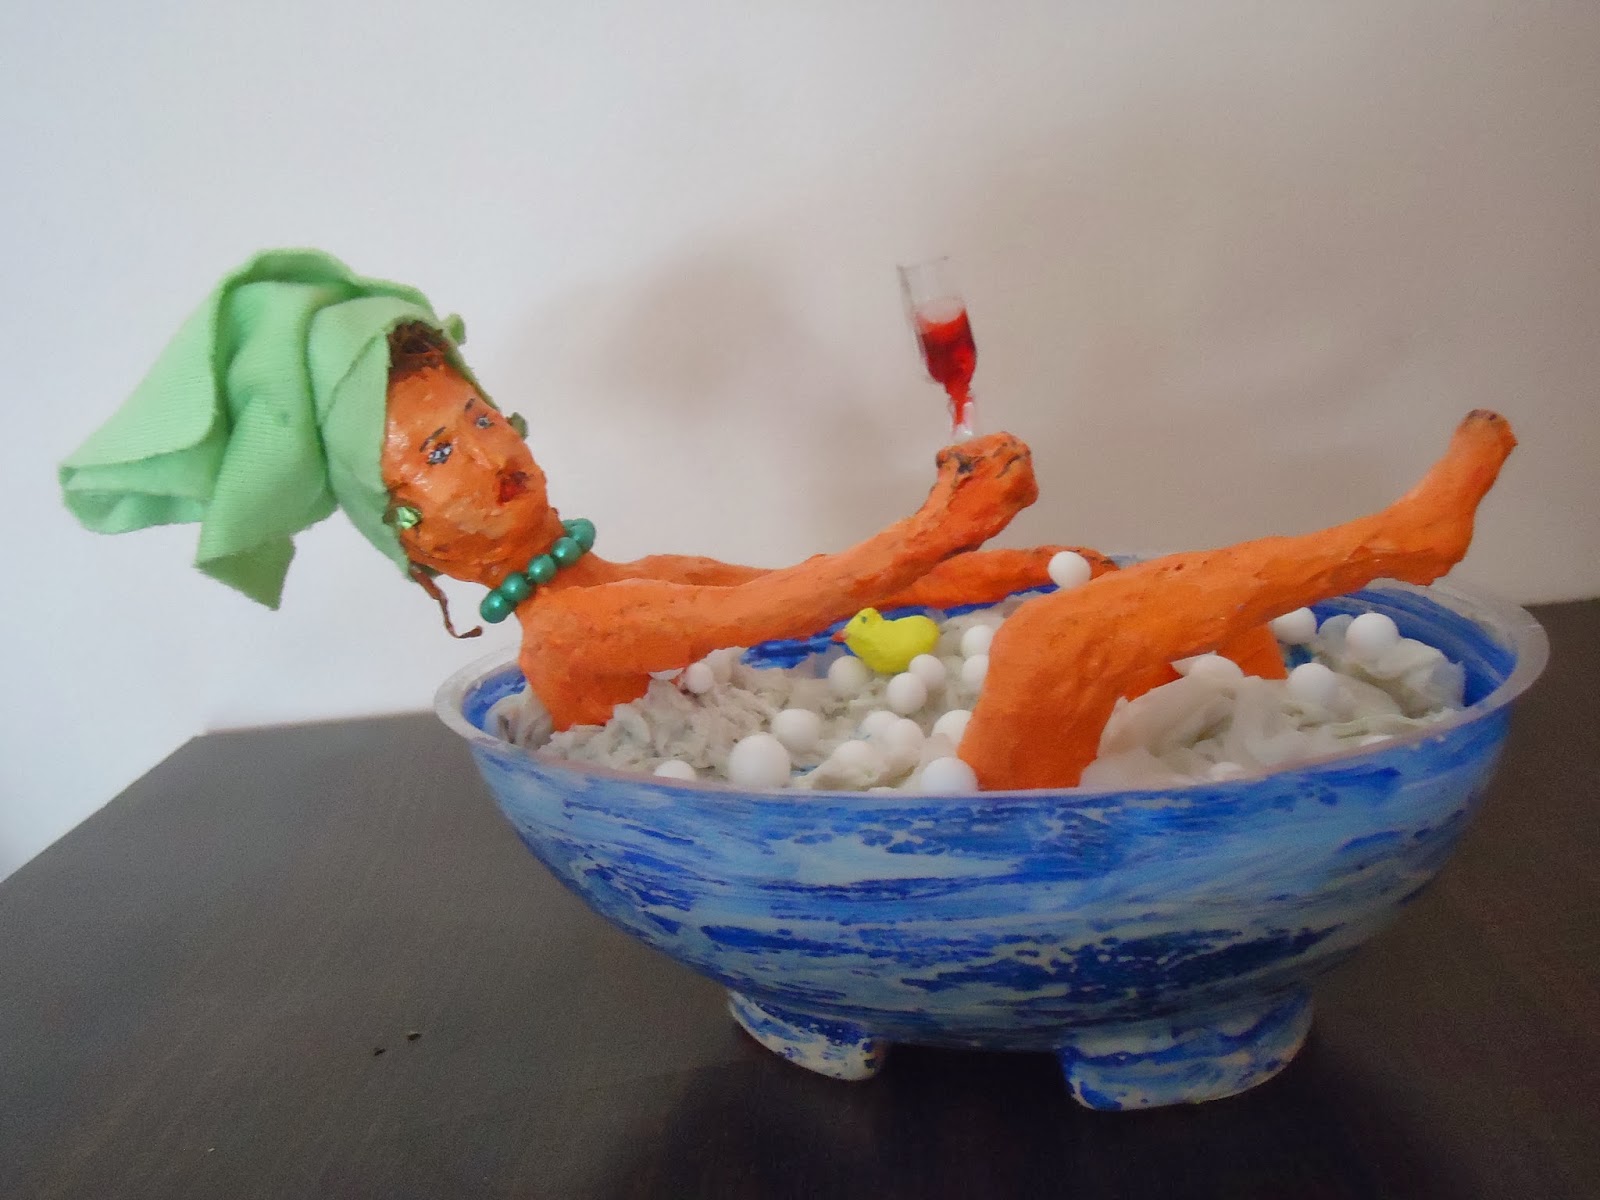
Show piece (paper mache)
Made a bathing dame out of thrash lying around the house...........

Used a wire that was string to last years diary to create a model skeleton, head of the garlic pod, kitchen tools (knife, scissors etc) and made glue of flour (which was lying open since we went out and had caught bugs) and water.....and a roll of toilet tissue!!!
I shaped the wire to create a base. I tore the tissue into small bits and let it soak in the sun for a day....Added some flour and water (also salt to avoid molds) and made in into a dough consistency.. . .I shaped a woman with the tissue dough around the wire and let it dry. In the mean while, I picked a plastic packaging material thrashed outside a grocery shop and painted it to give water effect. I further tore the remaining tissue and stuffed it in the tub to give a lather effect...
After shaping the tissue pulp I let it dry in the sun for another day. Next day I painted it with acrylic paints and coated it with varnish. Made her wine glass out of plastic bag. Stuck some accessories for the charm...
Kept in on the bathroom shelf as a show piece!!
Subscribe to:
Posts (Atom)


.jpg)